This is “Selling U: Résumé and Cover Letter Essentials”, section 2.3 from the book Powerful Selling (v. 1.0). For details on it (including licensing), click here.
For more information on the source of this book, or why it is available for free, please see the project's home page. You can browse or download additional books there. To download a .zip file containing this book to use offline, simply click here.
2.3 Selling U: Résumé and Cover Letter Essentials
Learning Objective
- Learn how to position your education and experience to create a résumé and cover letter to get the job you want.
Think about how you first learned about the new Palm Pre smartphone or that Gatorade had changed its name to simply “G.” How did you know that Pre had even more capabilities than the iPhone or that Gatorade was “moving to the next level”? Chances are it was some kind of advertising or public relations that made you aware of these products before you even tried them.
Now think about your personal brand. How will employers know about you and what you have to offer? A résumé and cover letter serve as your “advertising” campaign to prospective employers. Just like there are lots of ads about products and services, there are an overwhelming number of résumésA summary of a person’s background and experience. and cover lettersA one-page letter that acts as an introduction to a résumé. that employers have to review before inviting someone in for an interview. How do you make yours stand out? How do you increase your chances of being one of the people who are interviewed? How do you use your cover letter and your résumé to get the job you want?
There are a few important steps to follow to create the résumé and cover letter that will make you different and compelling to a prospective employer. You will use both of these to apply for jobs online and to send to people with whom you are networking, and you will even send them directly to companies for whom you would like to work. You only have an instant (think nanosecond) to make a lasting impression. If you think you only need a résumé to get a job, you should think again. Your cover letter can play an even more important role than your résumé. Here are some steps to help you create a cover letter that gets read and a résumé that gets you the interview. If you already have a résumé and cover letter, it’s worth reviewing this section because you will learn some important tips to improve them.
Five Steps for a Résumé That Stands Out
Looking for the right job to start your career is a process that includes preparing your résumé and cover letter, getting your cover letter and résumé to the right people, going on interviews, and negotiating and accepting the right offer. You are at the beginning of the process; you’ll learn about the rest of the process throughout the Selling U sections in this book. This section focuses entirely on creating your résumé and cover letter. Keep in mind that the only purpose for a résumé and cover letter is to get an interview. So your résumé and cover letter need to be crafted in a way that tells what your personal brand has to offer, or your brand storyThe highlights of what your personal brand has to offer to prospective employers., in a concise and compelling way.
Step 1: Define Your Three Brand Points That Make You Unique and Provide Value to a Prospective Employer
If this sounds familiar, it should be. This was covered in detail in Chapter 1 "The Power to Get What You Want in Life", but it is such an essential concept that it deserves repetition here. If you haven’t identified your three brand points, you should go back and review the section. Your brand points are actually the foundation of your résumé and cover letter; it is in their summary that you compose your brand story.
You might think of creating a résumé that is a chronological summary of your background. This is good, but it is not compelling enough to differentiate yourself amid the sea of résumés. There are two important things to remember when creating your résumé:
- Tell your brand story with your brand points.
- Your brand points should be clear at a glance (literally).
Let’s say your three brand points are leadership experience, academic excellence, and community service. Those three brand points make up your brand story, the story that you want to tell about yourself, so your résumé headings should highlight these areas.
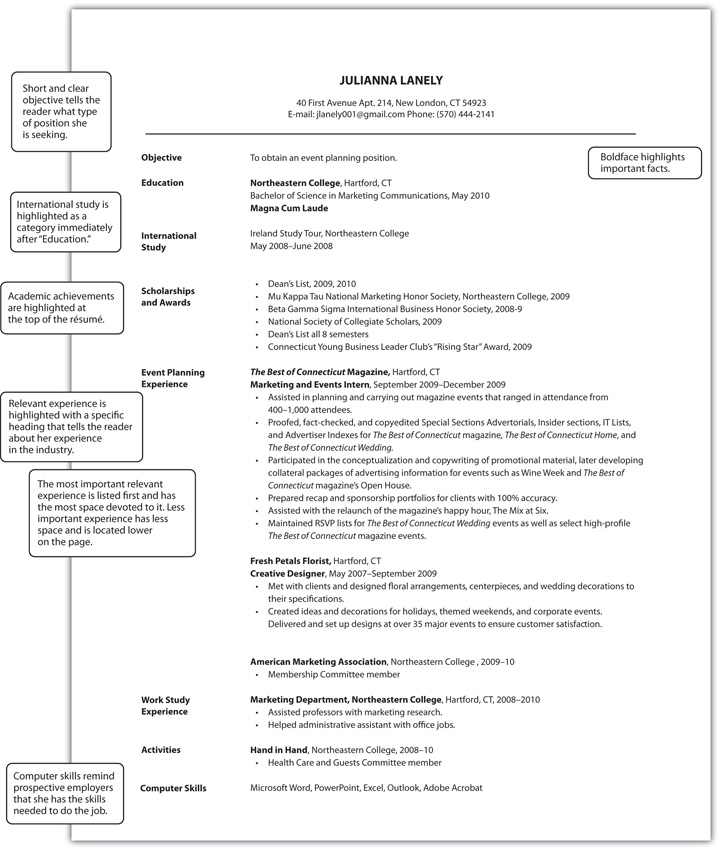
To see what this means, review the two versions of the same résumé for Julianna Lanely in Figure 2.7 "Standard Résumé" and Figure 2.8 "Standard Résumé Incorporating Brand Points". The first one was written using a standard résumé approach; the second one was built by incorporating her brand points of marketing and event planning experience, academic excellence, and creative mind-set. Can you see the difference? Which résumé do you think is more compelling? Before you create (or refine) your résumé, identify your three brand points.
Figure 2.7 Standard Résumé
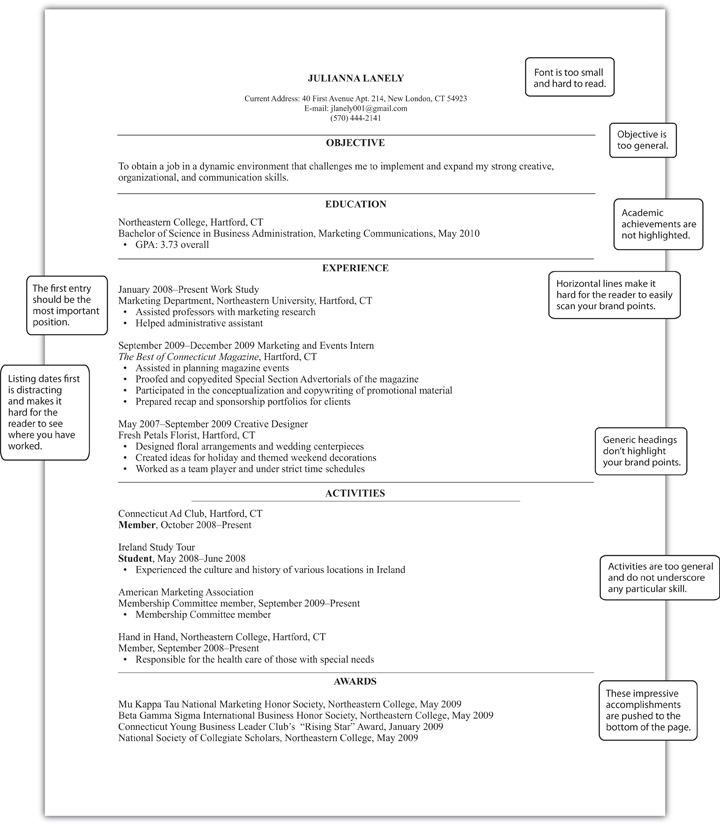
Figure 2.8 Standard Résumé Incorporating Brand Points
Step 2: Choose Your Résumé Format and Font
Now that you have the foundation of your résumé message (or your three brand points), it’s time to choose a résumé format. Executives in all industries encourage students and young professionals (those who have been working for five years or less) not to exceed one page for your résumé. In some cases, it may be difficult to keep all of your experience and accomplishments to one page, so choose those that best tell your brand story. As one executive said, “It better be worth my while to turn to page two.”Connie Pearson-Bernard, “Careers in Communications Night,” presentation at West Chester University, West Chester, PA, March 23, 2009.
There are several appropriate résumé templates available at your campus career center or in Microsoft Word. The downside to some templates is that they are difficult to adjust or adapt. The most important thing to consider when you are choosing your résumé format is to be sure it is easy for the reader to skim. Some formats with horizontal lines separating the categories, or those with dates that precede company and position information, are harder to skim because the reader has to work too hard to see the brand story. See the comments in Figure 2.7 "Standard Résumé" to recognize some things to avoid in your résumé.
It’s easy to create a résumé that looks like Julianna Lanely’s revised résumé shown in Figure 2.8 "Standard Résumé Incorporating Brand Points". Simply watch this short video and see how you can format it.
Video Clip
Résumé Formatting
(click to see video)See how easy it is to format your résumé using a table in Word.
Once you choose the format you want to use, you should choose a font that you will use for your résumé and cover letter. The font should be easy to read like Arial or Times New Roman (Arial is a bit more contemporary; Times New Roman is more traditional). It’s best to use twelve-point type (or eleven-point at the smallest) for ease of readability. If you need a little more space on your résumé, consider adjusting the margins slightly, keeping at least 0.7 for each margin. You don’t want your résumé to feel crowded or that it is an effort to read.
Step 3: Choose Your Headings and Put the Most Important Ones First
Now that you’ve done your groundwork, it’s time to actually create your résumé. Think about your brand points and then determine the headings you want to use. Use headings that help you tell your brand story at a glance. Don’t focus yet on what you will write in each heading; that will be covered in Step 4.
There are some headings that are standard to include such as “Objective,” “Education,” and “Experience,” but other headings should be used to support your brand story. For example, instead of having a heading for “Work Experience,” be more specific and use “Sales Experience” to highlight that if it is one of your brand points.
One of the most critical things to remember is to put the most important things first. Start with a heading for “Objective,” then “Education.” As you gain more experience in your career, your education will move to the bottom. But at this point, it is a key selling point for your brand.
Now, it’s time to put your brand points to work by choosing headings that tell your story. For example, if academic excellence is one of your brand points, you might consider adding a heading after “Education” called “Scholarships and Awards” or “Honors” to highlight honors and awards that demonstrate your academic excellence. This is the ideal place for things like dean’s list, National Honor Society, or any other awards, honors, or scholarships that you have received.
It’s a good idea for your next heading to reflect one of your brand points such as “Leadership Skills” or “Sales Experience” (or any other specific type of experience). If leadership skills are one of your brand points, it’s better to not make the reader go all the way to the bottom of the page to read about your leadership skills under a generic heading called “Activities.” If it’s important to your brand story, bring your skills into focus in the first part of your résumé with a strong heading like “Leadership Skills.” This section could include athletic, school or professional organization, or any other type of leadership position. If you don’t have leadership skills, don’t worry—you still have a lot to offer. Follow your brand points to tell your story.
Next, include your work experience. This is where you can really make your brand story come alive. Don’t be restricted to a traditional chronological order of your jobs. If you have had an internship in marketing, sales, or other area that supports your brand points, make a separate heading for it, such as “Marketing Experience” or “Sales Experience.” If you have had other jobs, you can simply add another heading after it called “Work Experience” below it. Or if your work experience has a common theme, you might want to name your heading “Retail Experience,” “Customer Service Experience,” or “Hospitality Experience.” This approach tells the reader at a glance that you have valuable experience in the area you want to pursue. You should know that employers look for people who have worked in retail and in restaurants because they know that they can sell and work with customers. Use this type of experience to sell yourself.
If you have participated in projects or activities to support the community, you may want to include a heading for “Community Service.” If you have additional activities that are worth noting, you might consider a heading for “Activities.” It’s best to avoid a long list of generic activities at the end of your résumé, so think about how they tell your brand story. It’s best to include your most recent activities. Although you may include some key activities from high school, it’s better if you can replace those with your more recent activities. It’s not necessary to include the dates of your involvement.
It’s a good idea to have a final heading for “Skills” at the end of your résumé. This should include computer software in which you are proficient such as Microsoft Word, PowerPoint, Excel, Access, Adobe Acrobat, and others. It’s a good reminder to your prospective employer that you are skilled for any position. Although it may seem second nature to you to use these software products, there are employers who didn’t learn them in school so they may not be aware that you are proficient in them.
A few things that should not be included on your résumé are “References available upon request,” “Hobbies and Activities,” or a photo. Prospective employers expect to check your references, you should have more substantial things to put on your résumé than hobbies and activities, and many companies cannot consider résumés with photos as it would be considered discrimination.
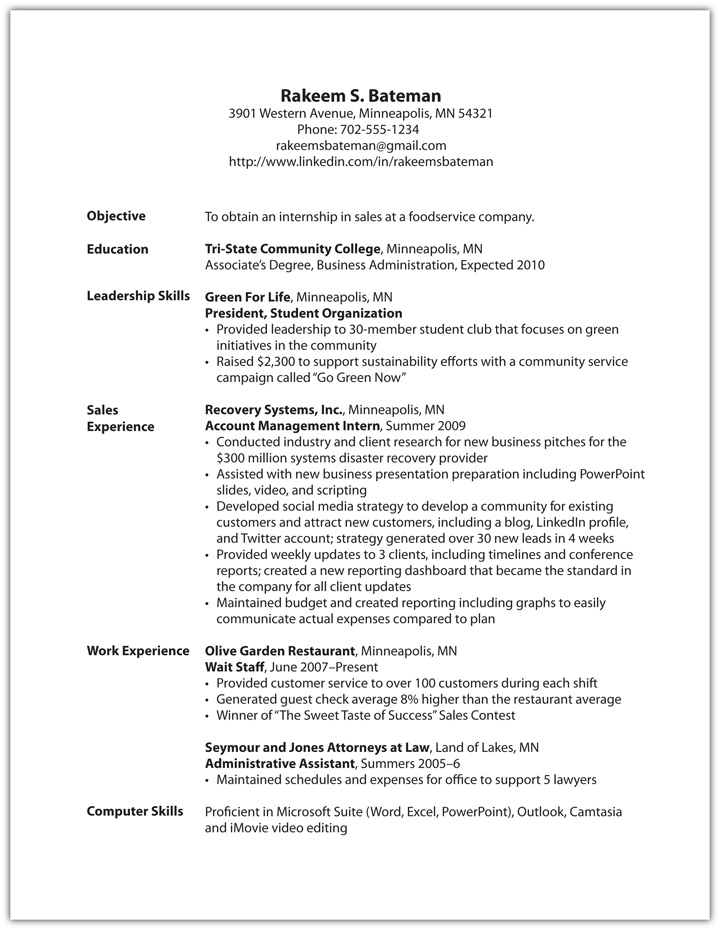
See Rakeem Bateman’s résumé shown in Figure 2.9 "Standard Résumé Incorporating Effective Headings" to see how headings are used effectively to highlight his brand points of leadership skills, sales experience, and a committed work ethic.
Figure 2.9 Standard Résumé Incorporating Effective Headings
Step 4: Write Your Bullet Points
Once you have determined your headings, it’s time to make your brand points come alive with bullet points under each heading. Bullet points are better than a narrative format because they are easier for the reader to skim. But, since the reader is skimming, each bullet point is that much more important. Keep your bullet points concise, but specific, so that each delivers powerful information.
Start with your objective and write a short, specific goal. One sentence is perfect; you don’t have to be flowery or profound. Something that helps the reader understand what you are looking for is best. For example, if you want to get a job in pharmaceutical sales, your objective might be, “To obtain a sales position at a pharmaceutical company.” Or you might want to get a job in an advertising agency so your objective might be, “To obtain a full-time position in account management at an advertising agency.” Short, sweet, to the point, and effective.
For your education, include the formal name of your college or university, city and state, formal degree (e.g., Bachelor of Arts, Communication Studies), and year or expected year of graduation. It’s not necessary to include the range of years you attended school. Now that you are in college, it’s best to remove your high school education. See Figure 2.9 "Standard Résumé Incorporating Effective Headings" for an example of how to list your education. You may be interested to know that your grade point average is not a requirement on a résumé. Generally, if your GPA is 3.5 or above, you may want to include it.Kim Richmond, Brand You, 3rd ed. (Upper Saddle River, NJ: Pearson Prentice Hall, 2008), 156. The fact is most business people don’t recognize the significance of a GPA unless it’s 4.0. So, if academic achievement is one of your brand points, you should consider adding a heading for “Scholarship and Awards” to demonstrate your accomplishments and make them come alive for the reader. If academics aren’t your strong suit, don’t include your GPA; just list your education.Kim Richmond, Brand You, 3rd ed. (Upper Saddle River, NJ: Pearson Prentice Hall, 2008), 156. If you have studied internationally, you might consider a heading or subheading named “International Study.” Include the program name, school, and countries visited, as well as the dates of the travel.
Awards or honors can be listed as bullet points under the “Scholarship and Awards” heading. For experience headings such as “Leadership Experience,” “Sales Experience,” or “Customer Service Experience,” list the name of the company, city and state, your title, and dates of employment. If you use boldface for the company name, it stands out and helps the reader see at a glance where you have worked. The bullet points in these sections are critical to setting yourself apart; they should be concise and specific, but descriptive, and they should focus on accomplishments and contributions, not a listing of activities or tasks. This will most likely take some time to write these bullet points, but it will be time well spent. Consider the difference between these two bullet points to describe a position at a restaurant:
-
Took orders over the phone and in person
This statement can be more powerful when restated with quantitative details:
- Provided customer service to over 100 patrons during every shift, including taking orders by phone and at table-side; named Associate of the Month in August 2009
Consider the difference between these two bullet points to describe administrative responsibilities at an office:
-
Filled in for receptionist, answered phones, processed invoices
This line can be more powerful when restated in the following manner:
- Provided administrative support for the 30-person office; created new work flow for processing invoices that reduced turnaround time by 2 days
Consider the difference between these two bullet points to describe responsibilities as a bank teller:
-
Processed customer transactions
This statement can be more powerful when restated as the following:
- Processed over 80 customer transactions daily with 100% accuracy.
Your bullet points should help reinforce your brand points with details of how you delivered on those points. It might be helpful to write down all the things you did at each job and then identify the stories you can tell for each job. This is how you demonstrate traits such as ability to multitask, organizational skills, teamwork, and other skills.
Step 5: Review, Check Spelling, Proofread, and Repeat
It’s true that some résumés are never even considered because of a typo or grammar error. After you finish your résumé, take a break, and then review it objectively. Does it clearly tell your brand story? Are your brand points the most important topics? If someone read your résumé, what would that person think you have to offer? Make any necessary adjustments. Then spell-check and proofread it carefully. It’s a good idea to ask some people you trust—perhaps at your campus career center, a parent, professor, or mentor—to review and proofread your résumé. You can’t be too cautious.
When you are satisfied that your résumé is perfect, print it on twenty-four-pound paper (you can buy it at your campus bookstore or any office supply store or Web site).
You’ve Got the Power: Tips for Your Job Search
How to Save It
It’s best to save your résumé and cover letter in several formats. A Word document is standard for sending résumés and cover letters. However, online job posting boards remove formatting, so it’s best to also save your documents as .txt files in Microsoft Word (File, Save As, for file type choose “Plain Text (*.txt).” Click OK when the dialogue box appears. Check your document to be sure elements are still in place; adjust accordingly, then save). It’s also helpful to save your documents in PDF format by going to Acrobat.com.Kim Richmond, Brand You, 3rd ed. (Upper Saddle River, NJ: Pearson Prentice Hall, 2008), 224. It’s a good idea to use a file name such as “John Jones Résumé” because it lets the reader know exactly what file he or she is opening and doesn’t give away your working name.Kim Richmond, Brand You, 3rd ed. (Upper Saddle River, NJ: Pearson Prentice Hall, 2008), 226. Avoid file names such as “Official Résumé,” or “Résumé January 2010” as they don’t include your name and are not professional.
Three Steps for a Cover Letter That Gets Noticed
If you haven’t prepared a cover letter to send with your résumé, you should consider writing one. According to a recent article in the New York Times, “Cover letters are still necessary, and in a competitive market they can give you a serious edge if they are written and presented effectively.”Phyllis Korkki, “A Cover Letter Is Not Expendable,” New York Times, February 15, 2009, business section, 10. A cover letter is key if you need to set yourself apart, whether you are seeking an internship or a full-time position.
Step 1: Start with Your Three Brand Points
Maybe you are dreading the thought of writing a cover letter. It’s easier than you think, since you have already identified your brand points. Write a summary statement for each of your three brand points. In other words, if you only had one minute to talk about your three brand points, what would you say about each one? Write two concise sentences for each point. It might be rough right now, but it will become the core of your cover letter.
Step 2: Understand the Elements of a Cover Letter
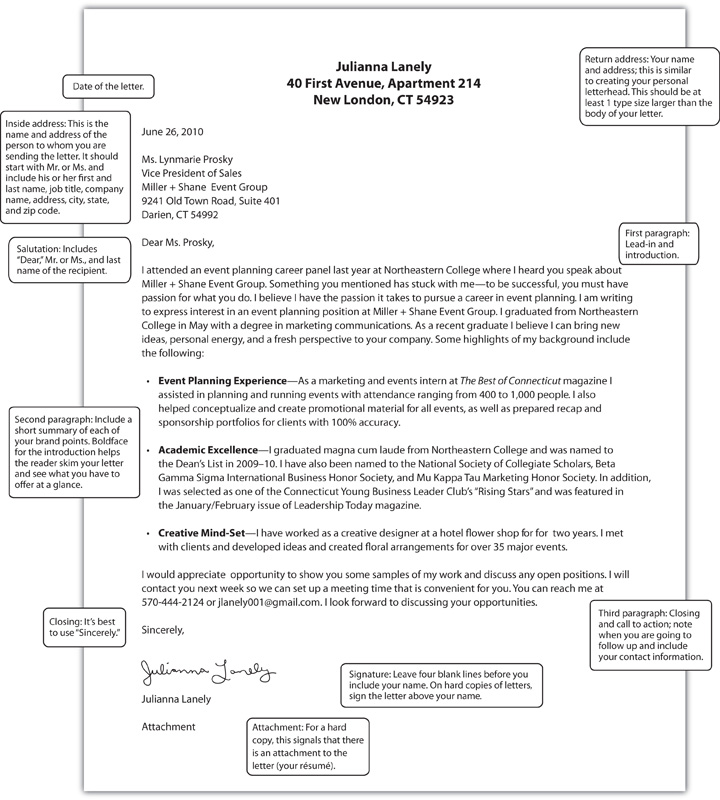
Now you just need to know how to structure your brand story to make it come alive for the reader. A cover letter has three major sections:
- First paragraph. Introduction and purpose for your letter.Kim Richmond, Brand You, 3rd ed. (Upper Saddle River, NJ: Pearson Prentice Hall, 2008), 162.
- Second paragraph. Reasons why you will bring value to the company (this is where you include your brand points).Kim Richmond, Brand You, 3rd ed. (Upper Saddle River, NJ: Pearson Prentice Hall, 2008), 162.
- Third paragraph. Closing and follow-up.Kim Richmond, Brand You, 3rd ed. (Upper Saddle River, NJ: Pearson Prentice Hall, 2008), 162.
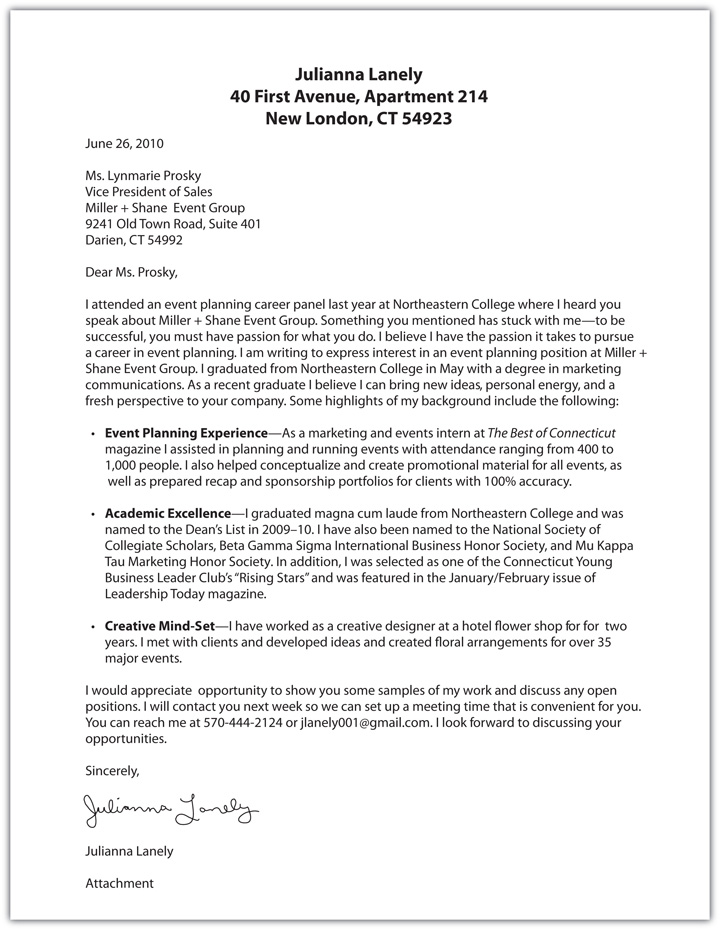
Since business people skim cover letters and résumés, it’s a good idea to use boldface to highlight your brand points.Kim Richmond, Brand You, 3rd ed. (Upper Saddle River, NJ: Pearson Prentice Hall, 2008), 162. Take a look at the cover letter in Figure 2.10 "Effective Cover Letter" to see how your brand points become the focus of your cover letter. It’s important to repeat the highlights of your résumé in your cover letter so the reader can see at a glance how you can bring value as a prospective employee. Since you only have a few seconds to “sell” the reader on the fact that you are the right person for the job, you want to introduce the highlights in the cover letter and then provide the details in your résumé. Your cover letter and résumé work together to tell your brand story.
Figure 2.10 Effective Cover Letter
Besides the three core paragraphs of your cover letter, you will also want to know about the appropriate way to format a cover letter. Your cover letter should be limited to a single page and should include the same font that you used for your résumé. See Figure 2.11 "Elements of a Cover Letter" for all the elements of a formal cover letter.
Figure 2.11 Elements of a Cover Letter
Step 3: Write Your Cover Letter
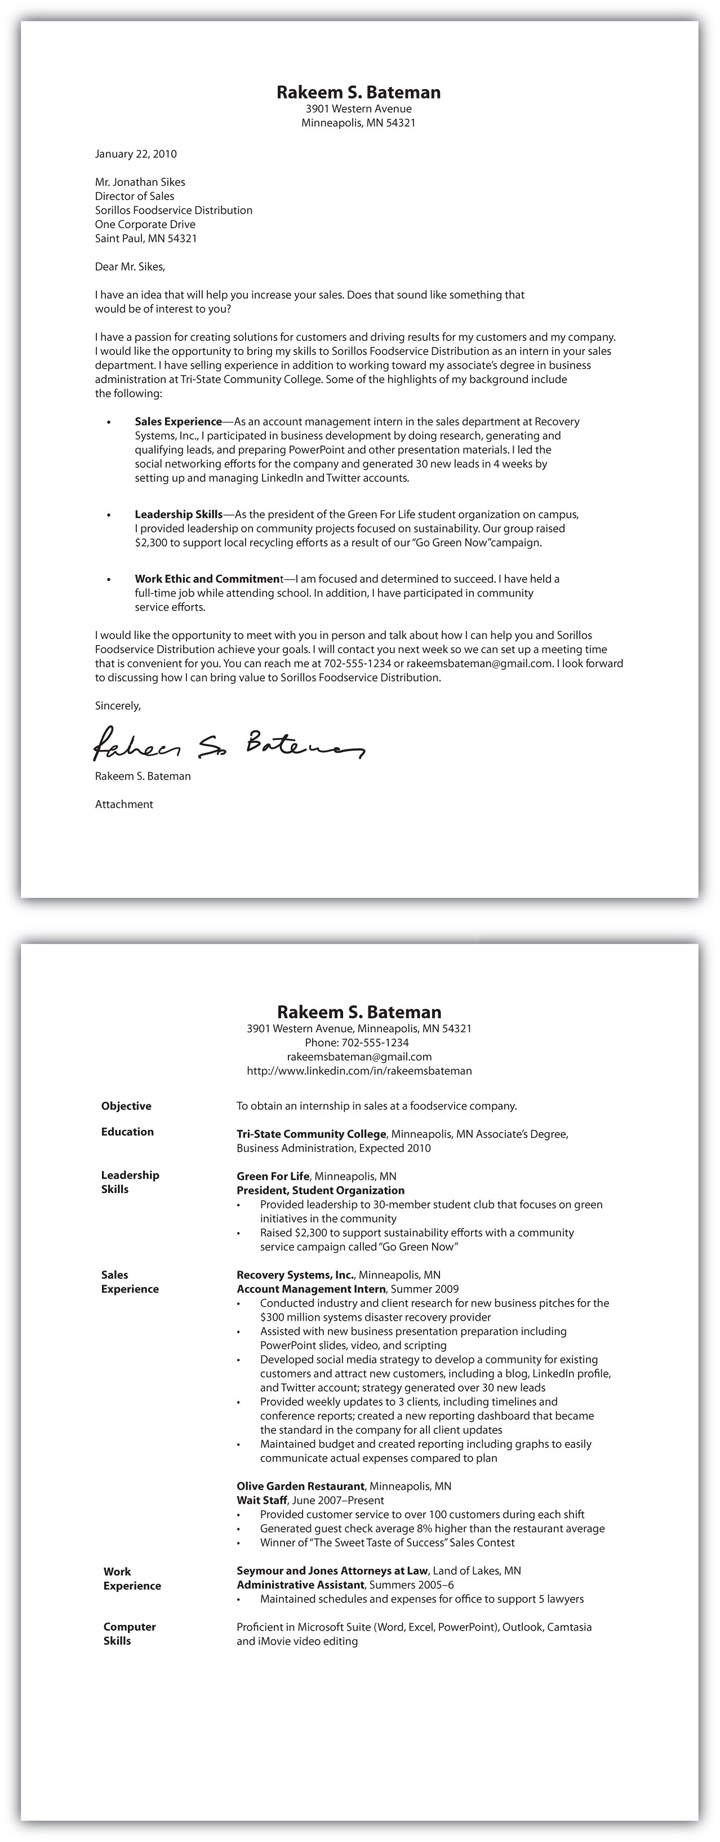
With your brand points in mind and the structure of a cover letter clearly defined, now you can get to writing. This is the place where you are able to demonstrate you personality and your selling skills. You can make your cover letter a powerful lead-in to your résumé and sell your prospective employer on the reasons why you should come in for an interview. As with your résumé, be sure to spell-check and proofread your cover letter carefully. Review your cover letter and résumé together to be sure your brand story is clear and powerful. Look at Rakeem Bateman’s cover letter and résumé together in Figure 2.12 "Sample Cover Letter and Sample Résumé" to see how the two documents can work together and really set you apart just at a glance.
Figure 2.12 Sample Cover Letter and Sample Résumé
This cover letter can be the basis of the letter you use for most situations. Now that you have your cover letter, you should adapt it and personalize it for every situation. For example, if you are applying for a job that is posted online, adapt the letter to show how your brand points address the needs of the position. You may even want to create one or two new brand points that also define your brand that you can change based on the job posting.
It’s best to use your cover letter whenever you send your résumé to someone, whether you are responding to a job posting, networking, or sending out letters to your target companies. The Selling U section in Chapter 8 "The Preapproach: The Power of Preparation" includes several ways to get your cover letter and résumé out to prospective employers.
Key Takeaways
- Your résumé and cover letter are your “advertising” tools for your personal brand.
-
There are five steps that help you write a résumé that stands out from the crowd.
- Your brand points are the basis of your résumé because they define your brand and the value you can bring to a prospective employer.
- You can choose a résumé format that is easy for the reader to skim and see your brand points.
- The headings on your résumé help provide a framework to tell your brand story.
- The bullet points under each entry on your résumé should focus on your accomplishments and achievements, not just a listing of job tasks.
- Always spell-check and proofread your résumé carefully. In fact, it’s a good idea to have several people review your résumé for accuracy before you send it to prospective employers.
- Your résumé should always be sent with your cover letter. Your cover letter highlights your brand points, which are further reinforced in your résumé.
- A cover letter contains three major parts: the first paragraph that acts as an introduction, the second paragraph that highlights the value you can bring to the company, and the third paragraph that is the closing.
Exercises
- Visit your campus career center and learn about different formats for your résumé. Which ones do you like? Why? Which one will you use? Is it easy for the reader to skim and see your brand story?
- Visit your campus career center and learn about the format for a cover letter. What elements are included in a formal cover letter, which are not included in a casual e-mail?


